Designed to give some ideas about how the files (HTML documents, images, etc.) in a website can be distributed among directories and how the resources can refer to each other from these different locations. We'll also make a small reference on how the files are placed in the server.
The way you organize a website depends pretty much on the type of website and the way you like to do it, but here we'll provide you some models that you can use to organize your website making each update an easier job. Our recommendation is that you create a main directory in your computer that will contain all the files and sub directories of the site, that you can later upload as is to the server.
The first thing you have to think of is that putting all the files in the root directory may be fine for a site with 5 pages and 3 images. But if you have to handle 20 pages and 200 images, that organization model can turn into a serious problem. So what you can do is to start grouping the files in some way and placing them in different directories to make your site a little easier to manage and update.
For example, let's say that you have a site where you show up your artwork: a collection of 5 images designed by yourself. After think it for a while, you decide that you'll build one page to show the images, plus the home page and the contact page. This makes a total of 3 pages and 5 images. As it's not much, you can actually create this directory structure that will hold your files well organized:

So, you've built your directory structure with the root directory and its sub directory "img", you put all the images in the "img" directory and all the HTML documents in the root. This works fine for the next 6 months while you continue to create more of your artwork. Suddently you have 100 images and you begin to realize that this directory structure model is getting obsolete as you have already placed a hundred files in a single directory.
At this point you can live in the mess or you can adopt a new directory structure. For example, you can divide your images into groups thematically: flowers, people, animals, fantasy and surrealism. This way you can show all the images corresponding to a same category in a single page (taking into account that the images are small enough to don't make the page load last to eternity).
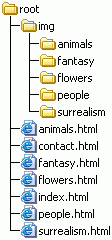
You can put now each image into its corresponding directory, which will give an average of 20 images per directory. And this directories can yet be subdivided (e.g., the "animals" directory can contain a sub directory named "birds").
Just when you're happy with you site, your friends come to you asking that you give them the opportunity to show their works in your site, which looks like a great idea to you. But again, how do you organize all this information in a way that you don't end up making a mess? Well, a good idea is to use the previous organization exactly as is, but for each one of the artist that will show up their works in the site. This will result in one directory for each artist containing their images and document administrated in sub directories.
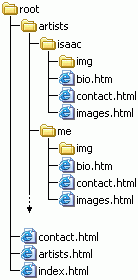
Now you can keep adding and adding sub directories to each artist's directory, and combining structures. Note that this structure may also apply for a website's sections instead of artists. You can create the directory structure that you like, the point is that you feel comfortable managing and updating the files.
Once you've picked up your directory structure you can start building links. To build a link you need to know the address of the resource you're going to link to, in order to fill the "href" attribute.
First of all, you must understand that the "root" directory will be represented in links by the URL or main directory of the site. Using generic examples, a root directory may be represented by "http://www.mydomain.com" if you own a domain name, or by "http://www.server.com/mysitename" if you don't. This will turn the address "root/img/image1.jpg" into "http://www.mydomain.com/img/image1.jpg" (if you own the domain name).
There are two ways to build a link: using full URLs or using relative URIs (see URI and URL definitions). The easiest way is using the full URL. This way you just write down the whole path without taking care of where the destination resource is referred from. For example to refer to Isaac's biography document in the third example of the directory structure you should write "http://www.mydomain.com/artists/isaac/bio.html" no matter where you're linking from (i.e., the directory where the document containing the link is).
This linking way works fine to link to external resources (located in different computers) or internally if you have a domain name of your own and you intend to keep it that way, but suppose that you decide to change your domain name or you change from a free server (http://www.freeserver.com/mysite) to a paid server where you can have a domain name of your own (http://www.mydomain.com). You can easily see that you will have to correct all the links, replacing the old domain name by the new one.
To avoid this problem you can make use of relative URIs. A relative URI is a part of a full URL, and can be considered as the path you have to cross (through directories) to go from the referring document to the destination resource. To make it clear lets give some examples based on the Directory Structure's third example.
So, lets say that you want to put a link to Isaac's biography in the "artists.html" document. As the referring document is located at the "root" directory, we'll begin from there:
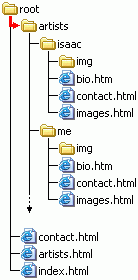

Now we have the path. The only thing left to do in order to get the relative URI, is to separate all this parts with slashes, what results in: "artists/isaac/bio.html". And there is your "href" value.
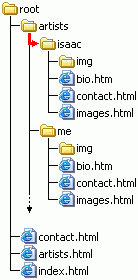
You may be asking yourself: how do I go back?. The way to go back is using the special directory "..", which represents a directory's parent directory. So whenever you want to build a relative URI and you need to "go back" to the previous directory, you must use the ".." directory. Let's see an example where we need to insert a link in my biography page pointing to Isaac's biography page. Again, as the referring document is located in the "me" directory, we'll begin from there.
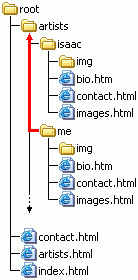
After separate it with slashes, we get the relative URI: "../isaac/bio.html".
There are a few basic things that you must consider before moving your files to the server. The first one is that you must know which one of the directories in your server acts as "root" for all the public directory structure (container for the files that can be accessed by the public). In most free servers the root directory is easy to identify, because it's the top directory, which means that you can't go upper from there. But when you pay for a server you usually get a different directory structure where the directory "public_html" act as root for you website. Anyway, if you can't figure out which directory is the "public", you should ask for support to the service provider.
The other thing to take into account is what files your server consider to be index files. An index file is the one that's shown when the request doesn't specify a file (e.g., "http://www.mydomain.com/" or "http://www.mydomain.com/thisfolder/"). Index files varies depending on the server but most of them consider "index.htm" and "index.html" as index files, which is fine to begin with.