Designed for beginners, who have never written an HTML document manually and need to know where to do it and how to save it, this tutorial will show the process to create an HTML file. Even when this process doesn't belong to the HTML language itself we'll try to give a small idea for those who still don't know how to do it.
An HTML document is a simple file containing text in a specific Markup language named HTML. That information, even when written in a structured way that makes it fit in the markup language standard, is a simple sequence of characters that can be found in a normal keyboard.
A file containing an HTML document may have several extensions. In fact, it may have whatever extension you want, but an HTML document located at a file with an extension like "bmp" (usually associated with bitmap files) may not be interpreted in the way we'd like to (as an HTML document). So we'll list only the extensions that will be "read" by user agents as HTML documents.
You may find many times when surfing the web that the URL address in your browser corresponding to the document you're actually reading has a file extension like "php", "asp", "pl" or "cfm" (sometimes followed by a question symbol "?" and many other things). Even when these extensions are associated with different server-side languages, at the moment they arrive to the client-side they are no other thing but HTML documents. This is because these files contain originally server-side scripts that are processed every time a user agent request them (before they are sent) and are transformed into normal HTML documents.
But to begin writing HTML code we'll only be using two extensions: "htm" and "html". The difference between those two extensions is simply one letter (html isn't supported by older operative systems which represents almost nothing in these days), so you can use them as you prefer.
Once you've decided which extension you'll use, you can pick up the file name and create the file. The process of creating the file is a simple task that involves a little knowledge about your operative system. Operative systems may differ in the way that users can create a file but not much. Anyway, we'll show the process of creating the file in Windows XP and leave you to figure out or investigate how to do it in other operative systems.
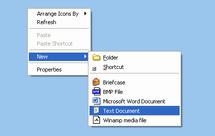
 We'll create a file in the desktop as it's only an example, but you may later consider an ordered structure (see our "Organizing a website" tutorial to learn ways to organize files among folders). So the first step is to right click on the desktop and select "New" and then "Text Document". this will create a text file and automatically will let you input a file name. There you put the filename and the extension chosen (e.g., "example.html").
Note: In order to successfully change the file extension from "txt" to "html", you'll need to configure your operative system to show file extensions. To do so, open a folder (e.g., My documents), go to the "Tools" menu and select "Folder options...". Once the options window is opened you must click on the "View" tab and un check the box "Hide file extensions for known file types".
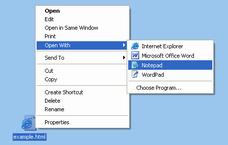
 Now the name has been picked up (e.g., example.html) and the file has been created: you're ready to begin editing this new file. Choose an editor and open the file. Our recommendation is that you use a basic text editor. Most of the modern operative systems provide basic text editors that you can use to edit your web pages. You can also use other editors but without adding format (e.g., bold text) and saving the file as plain text only. In this example, we'll use the Windows notepad to edit the file. Simple right click the file recently created and select "Open with" and then "Notepad". This will open up the new HTML document in the Notepad text editor.
Now you're ready to start writing your web page. In most modern operative systems you can see the resulting document in your default browser by double clicking on the file. This way you can edit and test your files in a very easy way.